Blog to understand automation concepts in QTP, Selenium Webdriver and Manual Testing concepts

Creating first TestNG test using eclipse for Selenium WebDriver


TestNG provides a testing framework to test the application. TestNG framework can be used to write unit test, integration as well as functional tests. Our objective in this blog will be to understand and implement TestNG framework while automating with Selenium WebDriver using eclipse.


In the previous article, we explained how to install TestNG libraries with eclipse. In this article, we will explain how to create first TestNG test in eclipse.

Pre-Requisite: We have installed TestNG as discussed in previous article.


Steps to create first TestNG test in eclipse:

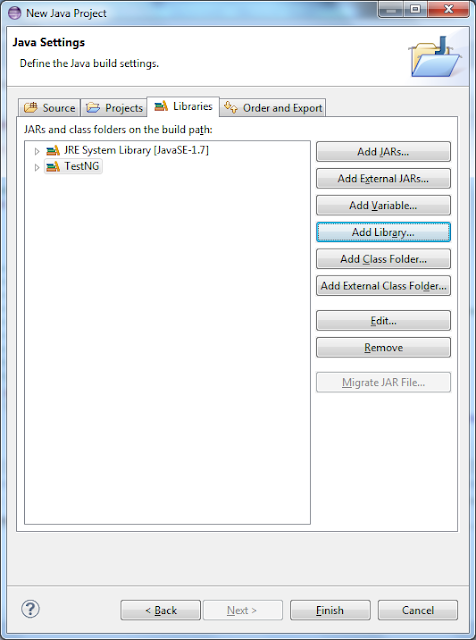
  • Create a new Project in eclipse as shown in the image below and add the TestNG library:

Add TestNG library to eclipse java Project


Add TestNG library
Add caption

  • Once we have added the library, we can use the library in our test.

Creating a testNG Class in the java Project:


A testNG test is executed based on the testNG annotations in the TestNG class.

Creating a testNG class
New TestNG class

Below code will be generated once we click on finish.


 package testNG;  
 import org.testng.annotations.Test;  
 import org.testng.annotations.BeforeTest;  
 import org.testng.annotations.AfterTest;  
 public class NewTest {  
  @Test  
  public void f() {  
  }  
  @BeforeTest  
  public void beforeTest() {  
  }  
  @AfterTest  
  public void afterTest() {  
  }  
 }  

Setting Up TestNG with eclipse


The below image explains how to setup TestNG with eclipse.


A. Navigate to Help>Install new Software.

B. Search for TestNG or http://beust.com/eclipse in Step B.)

C. In Step C.), Select checkbox for TESTNG and click on next.

D. In step D.) accept  the license agreement.

E. Software download will start and will be installed.

F. Once download is completed, it will ask to restart the eclipse. Click on Yes. This will restart eclipse.


Installing TestNG

In the next article, we will discuss how to create a TestNG test for selenium in eclipse.

Code to Capture screenshot in Selenium WebDriver Automation

When we run a script in any automation framework, Capturing and reporting images especially in case of failure is required. In this article, we will discuss different ways to capture screenshot and how to report with screenshot.


Steps to reporting with screenshot:


  • Create an independent function to capture screenshot.
  • Call the screenshot function from the reporting function based on whether to capture screenshot or not.

Different ways to capture screenshot are:


  • Using Java.awt class - Recommend to use if automation interacts with other application together with web application.

  • Using Selenium webdriver (selenium.TakesScreenshot) - Use this to capture screenshot if only web application is to be tested which are identified using selenium webdriver.

Below code shows how to capture screenshot using the above classes:

1:  package testproject;  
2:  import java.awt.Rectangle;  
3:  import java.awt.Robot;  
4:  import java.awt.Toolkit;  
5:  import java.awt.image.BufferedImage;  
6:  import java.io.File;  
7:  import java.util.List;  
8:  import javax.imageio.ImageIO;  
9:  import org.apache.commons.io.FileUtils;  
10:  import org.openqa.selenium.OutputType;  
11:  import org.openqa.selenium.TakesScreenshot;  
12:  import org.openqa.selenium.WebDriver;  
13:  import org.openqa.selenium.ie.InternetExplorerDriver;  
14:  public class testingC {  
15:       static WebDriver driver;  
16:       public static void main(String[] args) throws InterruptedException {  
17:            // Connect to the Internet driver server and create an instance of Internet explorer driver.       
18:            File file = new File("D:\\selenium\\IEDriverServer.exe");  
19:            System.setProperty("webdriver.ie.driver", file.getAbsolutePath());       
20:            try  
21:       {  
22:                 driver = new InternetExplorerDriver();  
23:            }  
24:            catch(Exception e)  
25:            {  
26:                 driver=new InternetExplorerDriver();  
27:            }  
28:            driver.navigate().to("https://qaautomationqtp.blogspot.com");  
29:            try {  
30:                 Capturescreenshot("testingscr.png");  
31:                 CapturescreenshotJava("D://testingscr1.png");  
32:            } catch (Exception e)   
33:            {  
34:                 e.printStackTrace();  
35:            }  
36:       }  
37:          public static void Capturescreenshot(String StrscreenshotName) throws Exception   
38:          {  
39:              File generateFile = ((TakesScreenshot)driver).getScreenshotAs(OutputType.FILE);  
40:              String strOutFile = "D:\\"+StrscreenshotName;  
41:              FileUtils.copyFile(generateFile, new File(strOutFile));  
42:          }  
43:          public static void CapturescreenshotJava(String StrscreenshotName) throws Exception   
44:          {  
45:                    Robot robot = new Robot();  
46:                    Rectangle screenRect = new Rectangle(Toolkit.getDefaultToolkit().getScreenSize());  
47:                    BufferedImage scrImg = robot.createScreenCapture(screenRect);  
48:                    ImageIO.write(scrImg, "png", new File(StrscreenshotName));  
49:              }   
50:  }