Blog to understand automation concepts in QTP, Selenium Webdriver and Manual Testing concepts

Showing posts with label Selenium Testng. Show all posts

Continuing TestNG test execution post assertion failure

Assertions are used to validate if a condition holds true. In previous article, we discuss on how to create assertion in TestNG.


See: How to work with Assertions in TestNG tests.


Assertion added in previous article were hard assertion, i.e : current test execution stops once an assertion fails and the next test in the test suite is executed while using hard assertions. When we use import org.testng.Assert library, the test execution stops once an error is encountered. This is useful to stop an test execution in case of critical defect in the test, and move to next test in the suite.


Example of creating multiple test in explained in the below TestNG.xml


 <?xml version="1.0" encoding="UTF-8"?>  
 <!DOCTYPE suite SYSTEM "http://testng.org/testng-1.0.dtd">  
 <suite name="Suite1">  
 <test name="Test1">  
 <classes>  
   <class name="testNG.assertionVal"/>  
 </classes>  
 </test>  
 <test name="Test2">  
 <classes>  
   <class name="testNG.NewTest1"/>  
 </classes>  
 </test>  
 </suite>  

There can be scenario where we do not want to stop test execution due to a minor validation defect.  In that scenario we can use the concept of soft assertion, i.e the test case execution will continue although the test will be marked as failed in the final results but will be executed until the test flow is completed or an hard assertion failure condition occurs.


Below points are important to note from current article:

  • There are two types of assertion Hard assertion and soft assertion.
  • Hard assertion use import org.testng.Assert library
  • Soft assertion use import org.testng.asserts.SoftAssert library
  • Step  softas.assertAll() needs to be added to display the validation failure from soft assertion failure


Below code explains how to use soft assertion in the test.


 package testNG;  
 import org.testng.Assert;  
 import org.testng.annotations.Test;  
 //soft assertion will use the below softAssert class  
 import org.testng.asserts.SoftAssert;  
 public class assertionVal {  
      // Create an soft assertion object softas   
      SoftAssert softas = new SoftAssert();  
      @Test  
      public void assertVal()   
      {  
           //Create an assertion similar to hard assertion as shown below   
           softas.assertEquals("aaaa", "bb");  
           softas.assertEquals("aa","aaccc","asserts exists");  
           // this is an example of hard assertion, test will stop execution   
           //at this step in case error is encountered.  
           Assert.assertEquals("aa", "aa");  
           System.out.println("nitin");  
           //This step is very important as without this step,  
           //no soft assertion failure will be reported in test result.  
           softas.assertAll();  
      }  
 }  

How to work with Assertions in TestNG tests

     Assertions are added in TestNG to validate whether a condition is true or false and report in test results the execution state of condition. For example in selenium test for login, we provide valid username and password and login, we expect the title to be displayed correctly in the page. Assertions are used in code, where we need to validate the state of an object properties and fail the test in case expected conditions are not met.


Different type of assertions:


  • Assert.AssertEquals(Expected condition, Actual condition) – This compares the expected condition with actual condition and fails the test in case the assertion fails.Different object types can be compared using Assert.AssertEquals
 
  • Assert.AssetEquals(Expected condition, Actual condition, Message)- This compares the expected condition with actual condition and fails the test in case the assertion fails displaying the message as defined while calling the assertion.
 
  • Assert.assertFalse(Boolean condition) - Asserts that a condition is false
 
  • Assert.assertFalse(Boolean condition, String Message )- Asserts that a condition is false. If it isn't, an Assertion Error, with the given message, is thrown.

  • Assert.assertTrue(Boolean condition, String Message )- Asserts that a condition is true. Assertion fails if condition is not true and string message is displayed.

  • Assert.AssertNull(object) – Validates if a assertion is null.


There are various other assertion which we can add in TestNG test. The issue with assertion is case execution stops in case an assertion fails. So if we do not want to stop a test on failure and continue with test execution, using assert statement will not work, instead we can wrap the assert function to verify the test condition and continue with test execution. We will discuss in future article for how to use soft assertion in the test scripts.


Below code explains how to use different assert in TestNG tests.


 package testNG;  
 import java.io.File;  
 import org.openqa.selenium.WebDriver;  
 import org.openqa.selenium.ie.InternetExplorerDriver;  
 import org.testng.Assert;  
 import org.testng.annotations.BeforeTest;  
 import org.testng.annotations.Test;  
 public class assertionVal {  
      WebDriver driver;  
      @BeforeTest  
      public void setup()   
      {  
           File file = new File("D:\\selenium\\IEDriverServer.exe");  
           System.setProperty("webdriver.ie.driver", file.getAbsolutePath());       
           driver = new InternetExplorerDriver();  
      }  
      @Test  
      public void assertVal()   
      {  
           driver.navigate().to("http://qaautomationqtp.blogspot.com");  
           Assert.assertEquals("Learning Automation Concepts in QTP", driver.getTitle());  
           //Assert to compare two values and reporting a message in case validation fails  
           Assert.assertEquals("aaa", "aaa", "this is the first test and value does not match");  
           //Assert to validate a boolean condition as false   
           Assert.assertFalse(driver.getTitle().contentEquals("Learning Automation Concepts in QTP"));  
           //Assert to validate a boolean condition as true   
           Assert.assertFalse(driver.getTitle().contentEquals("Learning Automation Concepts in QTP"));  
        //Assertion to validate an object is not null.  
        Assert.assertNotNull("driver");  
      }  
 }  

Understanding Parameters in TestNG tests

Parameters can be passed to a method from testNG.xml file. In this article, we will discuss on how to Pass parameter value in the methods.


Focus Area of this article:

  • How to pass a parameter from Testng.xml file to the test method.
  • How to define default value of a parameter in a test method.
  • How to pass multiple parameters through TestNG,xml

How to pass a parameter from Testng.xml file to the test method: 


In the below code, we have defined parameter with name as "Param1". Method mailval has argument test which will accept the value as defined in TestNG.xml file.

package testNG;

import org.testng.annotations.Parameters;
import org.testng.annotations.Test;

public class NewTestoptionalParameter {
@Test
@Parameters("Param1")

  public void mailval(String Test)
  {
   System.out.println(Test);
  }
}

In the testNG.xml file, we need to provide the parameter with name and a value assigned to the parameter as seen below. So if we execute this test from testNG.xml file, we will get the output as Parameter has name as param 1.

 <?xml version="1.0" encoding="UTF-8"?>  
 <!DOCTYPE suite SYSTEM "http://testng.org/testng-1.0.dtd">  
 <suite name="Suite1">  
 <parameter name="Param1" value="Parameter has name as param 1" />  
 <test name="Test1">  
 <classes>  
   <class name="testNG.NewTestoptionalParameter"/>  
 </classes>  
 </test>  
 </suite>  

Let us assume scenario where we have added a parameter in the Test method, but does not define and provide the value of the parameter in the testNG.xml file as shown in the below xml file code.In this case, on execution of the test, we will get the output as blank.

 <?xml version="1.0" encoding="UTF-8"?>  
 <!DOCTYPE suite SYSTEM "http://testng.org/testng-1.0.dtd">  
 <suite name="Suite1">  
 <test name="Test1">  
 <classes>  
   <class name="testNG.NewTestoptionalParameter"/>  
 </classes>  
 </test>  
 </suite>  

We can assign default value to a parameter using Optional as shown in the code below. Now in case we do not define the parameter in the TestNG.xml file, the argument will work with the assigned default value and will output in console as "testing".

package testNG;

import org.testng.annotations.Parameters;
import org.testng.annotations.Test;

public class NewTestoptionalParameter {
@Test
@Parameters("Param1")

  public void mailval(@Optional("testing") String Test)
  {
   System.out.println(Test);
  }
}

Next thing, we can define multiple parameters for a method as shown in the code below:

package testNG;

import org.testng.annotations.Parameters;
import org.testng.annotations.Test;

public class NewTestoptionalParameter {
@Test
@Parameters({"Param1","Param2"})

  public void mailval(@Optional("resting") String Test, String Test1)
  {
   System.out.println(Test);
  }
}

And finally , we can define the test parameter at test level as well as suite level. If a parameter is defined at both test as well as suite level, Parameter value defined at test level is considered. 

<?xml version="1.0" encoding="UTF-8"?>
<!DOCTYPE suite SYSTEM "http://testng.org/testng-1.0.dtd">
<suite name="Suite1">
<parameter name="Param1" value="Parameter has name as param 1s" /> 
<test name="Test1">
 <parameter name="Param1" value="Parameter has name as param 1t" /> 
 <parameter name="Param2" value="Parameter has name as param 2t" /> 
<classes>
    <class name="testNG.NewTestoptionalParameter"/>
</classes>
</test>
</suite>

Working with TestNG.XML to execute Selenium test suite

While using TestNG, we can execute multiple tests or methods in the project based on the test annotations, the methods, and classes in the Project. We will execute the test suite from eclipse using TestNG.xml in this article to keep it simple, although we can execute the Test Suite from command line or through Ant.

Pre-condition:

Focus of this article:

  • How to create TestNG xml file to run test suite.
  • How to run test from the TestNG xml file in eclipse.


Let us consider the below two classes in a Java Project. To Keep it simple, we are just outputting a value in each of the Test method. Suppose we have two different classes, we can create a test suite using testng.xml file and run the test suite from eclipse as shown in the below image.


Creating TestNG.xml file for different scenarios:


A. Run all the tests in both classes NewTest and NewTest1. This will execute all the methods with beforetest annotation in both the classes, followed by methods with test annotation, and then methods with afterText annotation.

 <?xml version="1.0" encoding="UTF-8"?>  
 <!DOCTYPE suite SYSTEM "http://testng.org/testng-1.0.dtd">  
 <suite name="Suite1">  
  <test name="Test">  
   <classes>  
    <class name="testNG.NewTest"/>  
       <class name="testNG.NewTest1"/>  
   </classes>  
  </test>  
 </suite>  


B. Run test in class NewTest and then the methods in NewTest1 class:

 <?xml version="1.0" encoding="UTF-8"?>  
 <!DOCTYPE suite SYSTEM "http://testng.org/testng-1.0.dtd">  
 <suite name="Suite1">  
  <test name="Test1">  
   <classes>  
    <class name="testNG.NewTest"/>  
         </classes>  
  </test>  
  <test name="Test2">  
   <classes>  
    <class name="testNG.NewTest1"/>  
   </classes>  
  </test>  
 </suite>  

C. Executing all tests in a package with name as TestNG(Note: TestNG is the name of package in our example, it can be any name other than TestNG also)

 <?xml version="1.0" encoding="UTF-8"?>  
 <!DOCTYPE suite SYSTEM "http://testng.org/testng-1.0.dtd">  
 <suite name="Suite1">  
 <test name="Test1">  
   <packages>  
    <package name="testNG" />  
   </packages>  
  </test>  
 </suite>  

D. Executing all tests based on the group Name:

 <?xml version="1.0" encoding="UTF-8"?>  
 <!DOCTYPE suite SYSTEM "http://testng.org/testng-1.0.dtd">  
 <suite name="Suite1">  
 <test name="Test1">  
  <groups>  
   <run>  
    <include name="testemail"/>  
    <exclude name="testnoemail"/>  
   </run>  
  </groups>  
   <classes>  
    <class name="testNG.NewTest"/>  
    <class name="testNG.NewTest1"/>  
   </classes>  
 </test>  
 </suite>  

E. Executing specific methods by including methods in the class:

 <?xml version="1.0" encoding="UTF-8"?>  
 <!DOCTYPE suite SYSTEM "http://testng.org/testng-1.0.dtd">  
 <suite name="Suite1">  
 <test name="Test1">  
 <classes>  
   <class name="testNG.NewTest">  
    <methods>  
     <include name="emailval" />  
    </methods>  
   </class>  
   <class name="testNG.NewTest1"/>  
 </classes>  
 </test>  
 </suite>  

What are Annotations in TestNG: Selenium Automation


In the Previous tutorials, we explained how to add TestNG to eclipse and how to set up for creating the first test using TestNG. In this article, we will understand what annotations in TestNG are and how they are used:


When we create a test in TestNG, we divide the code into different annotations based on which section needs to be executed and in which order. 

Let us take an example, We have three different tests to be automated. Each of the test starts with Login into application, In the next step, the user has either to view e-mails, write e-mail or verify successful login only. In the final step, we have to log out of application.


To code this, we have to login into application in each of the three test, so we can define this method or code in @BeforeTest.
Next we will define all the tests to be executed with annotation @Test and can assign group of test to be executed using group with test.

Once the test is executed, user will log out from application, this we will tag with annotation @AfterTest.

Below code explains how the three annotations can be used in the test. There are many more annotations which we can add in the test to give logical structure to the test.

 package testNG;  
 import org.testng.annotations.Test;  
 import org.testng.annotations.BeforeTest;  
 import org.testng.annotations.AfterTest;  
 public class NewTest {  
  @BeforeTest  
  public void Login()  
  {  
       System.out.println("Login into application");  
  }  
  @Test(groups = { "testemail" })  
  public void mailval()  
  {  
       System.out.println("test e-mail");  
  }  
  @Test(groups = { "testemail" })  
  public void emailval()   
  {  
       System.out.println("e-mailvalidated");  
  }  
  @AfterTest  
  public void Logout()  
  {  
       System.out.println("Logout from application");  
  }  
 } 

                                  Annotations in TestNG

   Below table explains the different annotation used in TestNG:


Annotation
Description
@BeforeSuite
Annotated method to be executed before all tests in the suite have run. 
@AfterSuite
Annotated method to be executed after all tests in the suite has run. 
@BeforeTest
Annotated method to be executed before any test method belonging to the classes inside the <test> tag is run. 
@AfterTest
Annotated method to be executed after all the test methods belonging to the classes inside the <test> tag have run. 
@BeforeGroups
The list of groups that this configuration method will run before. This method is guaranteed to run shortly before the first test method that belongs to any of these groups is invoked. 
@AfterGroups
The list of groups that this configuration method will run after. This method is guaranteed to run shortly after the last test method that belongs to any of these groups is invoked. 
@BeforeClass
The annotated method to be executed before the first test method in the current class is invoked. 
@AfterClass
The annotated methods to be executed after all the test methods in the current class have been run. 
@BeforeMethod
The annotated method to be executed before each test method. 
@AfterMethod
The annotated method to be executed after each test method.

In the next article, we will explain how a test suite is defined in TestNG and how does a test pass or fail in TestNG i.e how to add assertions in TestNG.

Creating first TestNG test using eclipse for Selenium WebDriver


TestNG provides a testing framework to test the application. TestNG framework can be used to write unit test, integration as well as functional tests. Our objective in this blog will be to understand and implement TestNG framework while automating with Selenium WebDriver using eclipse.


In the previous article, we explained how to install TestNG libraries with eclipse. In this article, we will explain how to create first TestNG test in eclipse.

Pre-Requisite: We have installed TestNG as discussed in previous article.


Steps to create first TestNG test in eclipse:

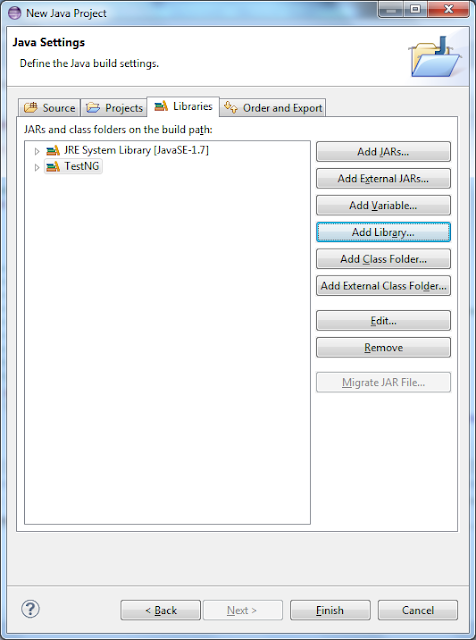
  • Create a new Project in eclipse as shown in the image below and add the TestNG library:

Add TestNG library to eclipse java Project


Add TestNG library
Add caption

  • Once we have added the library, we can use the library in our test.

Creating a testNG Class in the java Project:


A testNG test is executed based on the testNG annotations in the TestNG class.

Creating a testNG class
New TestNG class

Below code will be generated once we click on finish.


 package testNG;  
 import org.testng.annotations.Test;  
 import org.testng.annotations.BeforeTest;  
 import org.testng.annotations.AfterTest;  
 public class NewTest {  
  @Test  
  public void f() {  
  }  
  @BeforeTest  
  public void beforeTest() {  
  }  
  @AfterTest  
  public void afterTest() {  
  }  
 }  

Setting Up TestNG with eclipse


The below image explains how to setup TestNG with eclipse.


A. Navigate to Help>Install new Software.

B. Search for TestNG or http://beust.com/eclipse in Step B.)

C. In Step C.), Select checkbox for TESTNG and click on next.

D. In step D.) accept  the license agreement.

E. Software download will start and will be installed.

F. Once download is completed, it will ask to restart the eclipse. Click on Yes. This will restart eclipse.


Installing TestNG

In the next article, we will discuss how to create a TestNG test for selenium in eclipse.

How to Use FindElement(s) to identify Elements in Selenium WebDriver

The objective of this article  is to understand object Identification in selenium for the basic login Page in the application.Let us assume we have username/Password available for website. In this example, We will click on Link for Login, provide username and Password and click on Login button and validate login is successful.


Since we have to perform action on different objects, we need to identify objects or elements in the Page based on properties of the object. We use findElement or findElements to find a particular element or a list of element satisfying the object description. 

The findElement() method returns a WebElement object based on object description and throws exception if it does not find any element matching the object description. To return a webelement object, below is the syntax:

WebElement elemlink = driver.findElement(By.linkText("log in"));

Once we have the webelement defined, we can perform required action on the element. E.g: clicking a link, inputting text in an edit box or get text of the object.
Methods to work on an object using Selenium

In this example, we find collection of all elements in list elemlnk which have tagName as a, i.e collection of all the links in the page. Once we have the list, we can validate if a particular link is available in the Page by comparing the text or validating for broken links in the page based on http response.List<WebElement> elemlnk = driver.findElements(By.tagName("a"));for (int i=0;i<elemlnk.size();i++)
{String strData = elemlnk.get(i).getText();}So now, since we are familiar with basic of WebElement and WebElements, We can go further with the original problem in the Page which was:In this article, we will click on Link for Login, provide username and Password and click on Login button and validate login is successful.

Code for the problem:public void LoginInSagenda() { try {//finding link in the page for login and clicking on the link. WebElement elemlink = driver.findElement(By.linkText("Log in")); elemlink.click(); new WebDriverWait(driver,40).until(ExpectedConditions.titleContains("Log in"));//once link is clicked, we will verify title of the new page if (driver.getTitle().contains("Log in")) { System.out.println("Title of the Page contains text :" + driver.getTitle();          } else { System.out.println("Title of the Page does not contains text : Log in"); } //define elements on which to perform action. Note we use different ways to identify object in page by using Id, name and xpath in the page WebElement usr= driver.findElement(By.id("Email")); WebElement pwd= driver.findElement(By.name("Password")); WebElement login = driver.findElement(By.xpath("//input[@value='Login']"));// perform required action in the objects identified. usr.sendKeys("abc@xyz.com"); pwd.sendKeys("abcxyz"); login.click();// dynamic wait until a particular condition is met new WebDriverWait(driver,40).until(ExpectedConditions.titleContains("Dashboard"));//once link is clicked, we will verify title of the new page if (driver.getTitle().contains("Dashboard")) { System.out.println("Title of the Page contains text :" + driver.getTitle());   } else { System.out.println("Title of the Page does not contains text : Dashboard");   } } catch (Exception e) { System.out.println(e.getMessage());
}
}

The findElements() method returns a list of WebElements matching the object description. If no elements are found, it returns an empty list.