Blog to understand automation concepts in QTP, Selenium Webdriver and Manual Testing concepts

Showing posts with label Selenium Code. Show all posts

How to extract CSS properties of an element: Interview question Selenium

During functional test script creation using selenium , we came across steps like verify the background color , font size or the text color of the element. These are the different CSS properties associated with an element. We can extract the value of CSS properties using the below code:

What we require is to:
  • Identify the element 
  • Get CSS Attribute on the element
  • Store the property in a variable

WebElem = driver.findElement(By.id("testbhd"));

// to get background color
String bgColor = WebElem.getCssValue("background-color");

// to get text color
String bgColor = WebElem.getCssValue("color");

// to get font size
String bgColor = WebElem.getCssValue("font-size");

What are Annotations in TestNG: Selenium Automation


In the Previous tutorials, we explained how to add TestNG to eclipse and how to set up for creating the first test using TestNG. In this article, we will understand what annotations in TestNG are and how they are used:


When we create a test in TestNG, we divide the code into different annotations based on which section needs to be executed and in which order. 

Let us take an example, We have three different tests to be automated. Each of the test starts with Login into application, In the next step, the user has either to view e-mails, write e-mail or verify successful login only. In the final step, we have to log out of application.


To code this, we have to login into application in each of the three test, so we can define this method or code in @BeforeTest.
Next we will define all the tests to be executed with annotation @Test and can assign group of test to be executed using group with test.

Once the test is executed, user will log out from application, this we will tag with annotation @AfterTest.

Below code explains how the three annotations can be used in the test. There are many more annotations which we can add in the test to give logical structure to the test.

 package testNG;  
 import org.testng.annotations.Test;  
 import org.testng.annotations.BeforeTest;  
 import org.testng.annotations.AfterTest;  
 public class NewTest {  
  @BeforeTest  
  public void Login()  
  {  
       System.out.println("Login into application");  
  }  
  @Test(groups = { "testemail" })  
  public void mailval()  
  {  
       System.out.println("test e-mail");  
  }  
  @Test(groups = { "testemail" })  
  public void emailval()   
  {  
       System.out.println("e-mailvalidated");  
  }  
  @AfterTest  
  public void Logout()  
  {  
       System.out.println("Logout from application");  
  }  
 } 

                                  Annotations in TestNG

   Below table explains the different annotation used in TestNG:


Annotation
Description
@BeforeSuite
Annotated method to be executed before all tests in the suite have run. 
@AfterSuite
Annotated method to be executed after all tests in the suite has run. 
@BeforeTest
Annotated method to be executed before any test method belonging to the classes inside the <test> tag is run. 
@AfterTest
Annotated method to be executed after all the test methods belonging to the classes inside the <test> tag have run. 
@BeforeGroups
The list of groups that this configuration method will run before. This method is guaranteed to run shortly before the first test method that belongs to any of these groups is invoked. 
@AfterGroups
The list of groups that this configuration method will run after. This method is guaranteed to run shortly after the last test method that belongs to any of these groups is invoked. 
@BeforeClass
The annotated method to be executed before the first test method in the current class is invoked. 
@AfterClass
The annotated methods to be executed after all the test methods in the current class have been run. 
@BeforeMethod
The annotated method to be executed before each test method. 
@AfterMethod
The annotated method to be executed after each test method.

In the next article, we will explain how a test suite is defined in TestNG and how does a test pass or fail in TestNG i.e how to add assertions in TestNG.

Creating first TestNG test using eclipse for Selenium WebDriver


TestNG provides a testing framework to test the application. TestNG framework can be used to write unit test, integration as well as functional tests. Our objective in this blog will be to understand and implement TestNG framework while automating with Selenium WebDriver using eclipse.


In the previous article, we explained how to install TestNG libraries with eclipse. In this article, we will explain how to create first TestNG test in eclipse.

Pre-Requisite: We have installed TestNG as discussed in previous article.


Steps to create first TestNG test in eclipse:

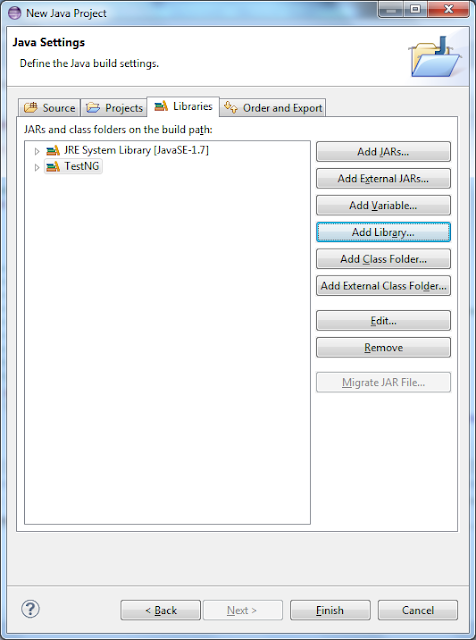
  • Create a new Project in eclipse as shown in the image below and add the TestNG library:

Add TestNG library to eclipse java Project


Add TestNG library
Add caption

  • Once we have added the library, we can use the library in our test.

Creating a testNG Class in the java Project:


A testNG test is executed based on the testNG annotations in the TestNG class.

Creating a testNG class
New TestNG class

Below code will be generated once we click on finish.


 package testNG;  
 import org.testng.annotations.Test;  
 import org.testng.annotations.BeforeTest;  
 import org.testng.annotations.AfterTest;  
 public class NewTest {  
  @Test  
  public void f() {  
  }  
  @BeforeTest  
  public void beforeTest() {  
  }  
  @AfterTest  
  public void afterTest() {  
  }  
 }  

Code to Capture screenshot in Selenium WebDriver Automation

When we run a script in any automation framework, Capturing and reporting images especially in case of failure is required. In this article, we will discuss different ways to capture screenshot and how to report with screenshot.


Steps to reporting with screenshot:


  • Create an independent function to capture screenshot.
  • Call the screenshot function from the reporting function based on whether to capture screenshot or not.

Different ways to capture screenshot are:


  • Using Java.awt class - Recommend to use if automation interacts with other application together with web application.

  • Using Selenium webdriver (selenium.TakesScreenshot) - Use this to capture screenshot if only web application is to be tested which are identified using selenium webdriver.

Below code shows how to capture screenshot using the above classes:

1:  package testproject;  
2:  import java.awt.Rectangle;  
3:  import java.awt.Robot;  
4:  import java.awt.Toolkit;  
5:  import java.awt.image.BufferedImage;  
6:  import java.io.File;  
7:  import java.util.List;  
8:  import javax.imageio.ImageIO;  
9:  import org.apache.commons.io.FileUtils;  
10:  import org.openqa.selenium.OutputType;  
11:  import org.openqa.selenium.TakesScreenshot;  
12:  import org.openqa.selenium.WebDriver;  
13:  import org.openqa.selenium.ie.InternetExplorerDriver;  
14:  public class testingC {  
15:       static WebDriver driver;  
16:       public static void main(String[] args) throws InterruptedException {  
17:            // Connect to the Internet driver server and create an instance of Internet explorer driver.       
18:            File file = new File("D:\\selenium\\IEDriverServer.exe");  
19:            System.setProperty("webdriver.ie.driver", file.getAbsolutePath());       
20:            try  
21:       {  
22:                 driver = new InternetExplorerDriver();  
23:            }  
24:            catch(Exception e)  
25:            {  
26:                 driver=new InternetExplorerDriver();  
27:            }  
28:            driver.navigate().to("https://qaautomationqtp.blogspot.com");  
29:            try {  
30:                 Capturescreenshot("testingscr.png");  
31:                 CapturescreenshotJava("D://testingscr1.png");  
32:            } catch (Exception e)   
33:            {  
34:                 e.printStackTrace();  
35:            }  
36:       }  
37:          public static void Capturescreenshot(String StrscreenshotName) throws Exception   
38:          {  
39:              File generateFile = ((TakesScreenshot)driver).getScreenshotAs(OutputType.FILE);  
40:              String strOutFile = "D:\\"+StrscreenshotName;  
41:              FileUtils.copyFile(generateFile, new File(strOutFile));  
42:          }  
43:          public static void CapturescreenshotJava(String StrscreenshotName) throws Exception   
44:          {  
45:                    Robot robot = new Robot();  
46:                    Rectangle screenRect = new Rectangle(Toolkit.getDefaultToolkit().getScreenSize());  
47:                    BufferedImage scrImg = robot.createScreenCapture(screenRect);  
48:                    ImageIO.write(scrImg, "png", new File(StrscreenshotName));  
49:              }   
50:  }  

Using ExpectedConditions for explicit wait in Selenium Webdriver.

In this article, we will discuss on different explicit wait asking the test script to wait for some time based on the expectedcondition for object defined by locator.Before discussing further, let us have a look at generic syntax for adding an explicit wait in the test using expected condition.


WebDriverWait wait = new WebDriverWait(driver, 1000);

wait.until(ExpectedConditions.presenceOfElementLocated(By.linkText("QAmail"))); 


In the first statement, we create an instance wait of the WebdriverWait object with arguments as driver object and the time to wait for existence of element.


In the next statement, we are asking the script to wait until the expected condition is met. In the above script, test script will wait for max 1000 second for element identified with linkText as "QAmail" to be available in the DOM for the page.


Let us define what are the different ways to use expected condition based on which we can add explicit wait in the object.

a. presenceOfElementLocated - Verify presence of element in the DOM.

WebDriverWait wait = new WebDriverWait(driver, 1000);

wait.until(ExpectedConditions.presenceOfElementLocated(By.linkText("QAmail"))); 


b. Using elementToBeClickable

wait.until(ExpectedConditions.elementToBeClickable(By.linkText("TGmail")));


c. Using invisibilityOfElementLocated

wait.until(ExpectedConditions.invisibilityOfElementLocated(By.linkText("tGmail")));


d. invisibilityOfElementWithText - Validating the invisibility of element with text for the element provided.

wait.until(ExpectedConditions.invisibilityOfElementWithText(By.xpath("//div[@id='_eE']"), "tGmail")); 


e. textToBePresentInElement - Validating the text to be present in the element defined by locator.

wait.until(ExpectedConditions.textToBePresentInElement(By.xpath("//div[@id='_eE']"),"Gmail")); 


f. visibilityOfElementLocated by locator.

wait.until(ExpectedConditions.visibilityOfElementLocated(By.xpath("//div[@id='_eE']"))); 


g. titleContains - Wait until the title is displayed correctly

wait.until(ExpectedConditions.titleContains("QA Automation QTP"));


h. alertIsPresent - waits for alert to appear in the window.

wait.until(ExpectedConditions.alertIsPresent());

How to get attributes values of element in Selenium using getAttribute Method

Using getAttribute, we can extract the value of attribute of an element in Selenium WebDriver. Extracting values of attribute of element can be helpful in a number of ways. Some of the important use of getattribute method are as follows: 


  • Name of all the links or button or an object type in the Page.
  • Validating if object with particular property exists in the Page.
  • Extracting the href value for a button/link.
  • Extracting values of element of a particular class or Id. For e.g: If error message are displayed on the page with the same class. We can get all the error messages displayed getting text attribute for all element with the common class name.

Below code explains use of getattribute in Selenium Webdriver for the above purpose.

 package testproject;  
 import java.io.File;  
 import java.util.List;  
 import org.openqa.selenium.By;  
 import org.openqa.selenium.WebDriver;  
 import org.openqa.selenium.WebElement;  
 import org.openqa.selenium.ie.InternetExplorerDriver;  
 public class testingC {  
      static WebDriver driver;  
      public static void main(String[] args) throws InterruptedException {  
           // Connect to the Internet driver server and create an instance of Internet explorer driver.       
           File file = new File("D:\\selenium\\IEDriverServer.exe");  
           System.setProperty("webdriver.ie.driver", file.getAbsolutePath());       
           try{  
                driver = new InternetExplorerDriver();  
       driver.manage().window().maximize();  
           }  
           catch(Exception e)  
           {  
                driver=new InternetExplorerDriver();  
           }  
           driver.navigate().to("https://google.com");  
           //function to get names of all the links in the Page  
           getALLNameforObject("link");  
           // function to validate a particular object with particular text appears in the Page  
           ValidateObjectExists("link", "About");       
           //   
      }  
      public static void getALLNameforObject(String strObject)  
       {  
           if(strObject.toLowerCase().trim().contentEquals("link"))  
           {  
                strObject = "a";  
           }  
           if(strObject.toLowerCase().trim().contentEquals("button"))  
           {  
                strObject = "button";  
           }  
           List<WebElement> elemLink = driver.findElements(By.tagName(strObject));  
           int intLinksinPage = elemLink.size();  
           System.out.println(intLinksinPage);  
           for (int i = 0;i<intLinksinPage;i++)  
           {  
                System.out.println("The name of the link " + (i+1) +" in the page is :- " + elemLink.get(i).getAttribute("text"));  
           }  
      }  
      public static void ValidateObjectExists(String strObject, String ObjName)  
       {  
           if(strObject.toLowerCase().trim().contentEquals("link"))  
           {  
                strObject = "a";  
           }  
           if(strObject.toLowerCase().trim().contentEquals("button"))  
           {  
                strObject = "button";  
           }  
           List<WebElement> elemLink = driver.findElements(By.tagName(strObject));  
           int intLinksinPage = elemLink.size();  
           System.out.println(intLinksinPage);  
           for (int i = 0;i<intLinksinPage;i++)  
           {  
                if(elemLink.get(i).getAttribute("text").contentEquals(ObjName))  
                {  
                     System.out.println("Link exists in Page with text " + elemLink.get(i).getAttribute("text"));  
                }  
           }  
      }  
 }  

How to Use FindElement(s) to identify Elements in Selenium WebDriver

The objective of this article  is to understand object Identification in selenium for the basic login Page in the application.Let us assume we have username/Password available for website. In this example, We will click on Link for Login, provide username and Password and click on Login button and validate login is successful.


Since we have to perform action on different objects, we need to identify objects or elements in the Page based on properties of the object. We use findElement or findElements to find a particular element or a list of element satisfying the object description. 

The findElement() method returns a WebElement object based on object description and throws exception if it does not find any element matching the object description. To return a webelement object, below is the syntax:

WebElement elemlink = driver.findElement(By.linkText("log in"));

Once we have the webelement defined, we can perform required action on the element. E.g: clicking a link, inputting text in an edit box or get text of the object.
Methods to work on an object using Selenium

In this example, we find collection of all elements in list elemlnk which have tagName as a, i.e collection of all the links in the page. Once we have the list, we can validate if a particular link is available in the Page by comparing the text or validating for broken links in the page based on http response.List<WebElement> elemlnk = driver.findElements(By.tagName("a"));for (int i=0;i<elemlnk.size();i++)
{String strData = elemlnk.get(i).getText();}So now, since we are familiar with basic of WebElement and WebElements, We can go further with the original problem in the Page which was:In this article, we will click on Link for Login, provide username and Password and click on Login button and validate login is successful.

Code for the problem:public void LoginInSagenda() { try {//finding link in the page for login and clicking on the link. WebElement elemlink = driver.findElement(By.linkText("Log in")); elemlink.click(); new WebDriverWait(driver,40).until(ExpectedConditions.titleContains("Log in"));//once link is clicked, we will verify title of the new page if (driver.getTitle().contains("Log in")) { System.out.println("Title of the Page contains text :" + driver.getTitle();          } else { System.out.println("Title of the Page does not contains text : Log in"); } //define elements on which to perform action. Note we use different ways to identify object in page by using Id, name and xpath in the page WebElement usr= driver.findElement(By.id("Email")); WebElement pwd= driver.findElement(By.name("Password")); WebElement login = driver.findElement(By.xpath("//input[@value='Login']"));// perform required action in the objects identified. usr.sendKeys("abc@xyz.com"); pwd.sendKeys("abcxyz"); login.click();// dynamic wait until a particular condition is met new WebDriverWait(driver,40).until(ExpectedConditions.titleContains("Dashboard"));//once link is clicked, we will verify title of the new page if (driver.getTitle().contains("Dashboard")) { System.out.println("Title of the Page contains text :" + driver.getTitle());   } else { System.out.println("Title of the Page does not contains text : Dashboard");   } } catch (Exception e) { System.out.println(e.getMessage());
}
}

The findElements() method returns a list of WebElements matching the object description. If no elements are found, it returns an empty list.