Blog to understand automation concepts in QTP, Selenium Webdriver and Manual Testing concepts

Understanding Insight Objects in UFT 11.5

With Unified Functional Testing, there were a lot of features like integrating GUI testing and API testing, introducing File Content Checkpoint, and create insight object or recording in Insight mode. 

In this article I will try to explain what this feature of Insight recording is and how to implement same.


Insight is an image-based identification ability, to recognize objects in application based on what they look like instead of using properties that are part of design. UFT stores an image of the object with insight test objects and uses this image as main description property to identify object in the application.


Together with insight property, UFT can use ordinal identifier to uniquely identify the object. Another property we can use is Similarity - Specifies how similar a control in the application has to be to the test object image for it to be considered a match. And Visual relation identifier can also be used to identify the object based on its relative position with respect to other objects in the application. 

Low points of insight object are we cannot add insight object from object spy and snapshots occupy a lot of disk space.

Adding Insight Objects :


UFT allow adding Insight object either in recording Mode or manually in object repository:

1.  Insight Recording

 When we record in UFT, There is option to select recording mode. The recording mode in UFT is default, analog, Low Level recording, and Insight recording. When we select recording mode as Insight recording, UFT records object as insight object for images and identifies rest of objects like edit box as window object WinObject and perform action on them.
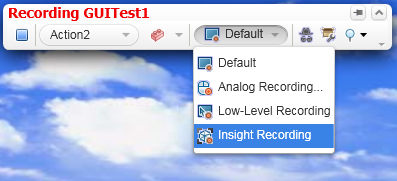
Recording bar in UFT 11.5

2.   Insight Objects can be added through Object Repository.

Go to Resources>Object Repository. This will open Object Repository window. In Object Repository window, Navigate to Object>Add Insight objects to Local. This can also be added by icon as shown below.
Once we click on Add Insight objects to local, UFT asks to select Learn Mode which can be manual and automatic. Manual Mode provides magnifier to select minute objects in the application.

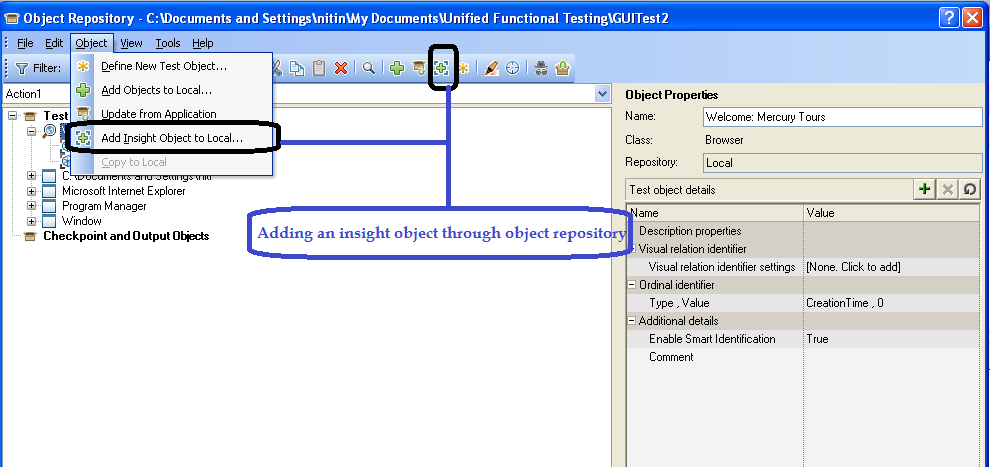
Adding object from object repository
Insight object is always added to the object repository as a child of the test object that represents its containing application, such as a Window or Browser object.
In the Editor, test object image is displayed in the step instead of the test object name. Enlarge Image is displayed on hovering over the object.

Options available to work with Insight in UFT 11.5:

UFT 11.5 provides following options for working with insight objects. Options for Insight Object are at Tools>Options>GUI Testing>Insight. This pane enables you to define options that customize how UFT handles Insight test objects when creating test object, and during record and run sessions.

Options to customize the insight object are as follows:

a.   Save the clicked coordinates as the test object’s Click Point when recording a test object.
b.   When recording a test, display mouse operations.
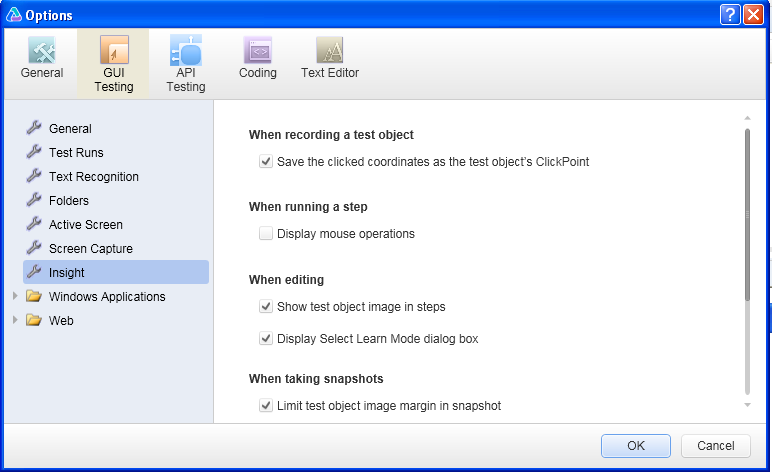
options for insight 
c.   When editing shows test object image in steps and displaying Select learn mode dialog box
d.  Snapshots for insight object takes a lot of disk space, we can provide option to limit test object image, maximum pixels around image, and maximum number of snapshots to save when recording a test object
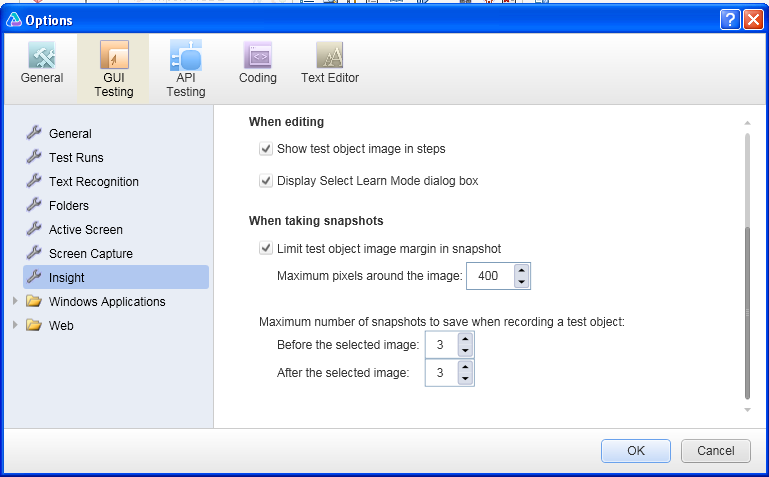
 
option for insight


Unified Functional testing: Understanding New Features

Unified functional testing 11.5 is latest from HP on functional automation testing. Previously I worked with QTP 11.0, and there are many changes in QTP 11 and UFT 11.5. Let me share the changes that I encountered and new features in UFT 11.5. Unified functional testing helps to work with API  as well as GUI together and the IDE has changed a lot from QTP 11.

1. UI Interface: 


Interface for UFT 11.5 has changed a lot from QTP 11 and it seems as if I was working on a completely new tool.

a.   Creating a new test:

Now we can create an API Test as well as GUI Test. API Test is for testing API Interface whereas GUI Test is the normal test or QTP Test that we have been creating in the past.
creating a new test in QTP

b.   Keyword View: 

We cannot  view Keyword view and expert view in UFT 11.5 together. To view Keyword view, We have to select View>Keyword View. To go back from keyword view to expert view, select View>Editor.
How a test looks in UFT

c.   UFT 11.5 provides easy navigation to functions/classes in the editor as shown in the below screenshot.

d.   Menu Option have changed a lot In UFT 11.5, with separate menu item for ALM, and redesign and menu options shuffled from one tab to another.

e.   Provides creating solution in which we can manage test documents including tests, function libraries, business components and test flows.


2.Using Solution explorer

we can work with multiple tests in the solutions and can edit, manage multiple tests at the same time.

3.   One of the new features of UFT 11.5 is Insight for object Identification

, an image-based identification ability to recognize objects in your application based on what they look like, instead of using properties that are part of their design. This can be useful if you are working with an application whose technology is not supported by UFT, or with an application running on a remote computer. This is a new feature and will be discussed in details in next articles.

4.   Using File content checkpoint

we can verify the content of file and can be useful for comparing Pdf files or contents of PDF file. PDF, HTML, Word, TXT, and RTF file types are supported.

5.  UFT supports testing for QT and Adobe flex Applications.

6.  Supports Microsoft Office and plug-in controls.

7.  In API Testing, Using the soapUI to API Test conversion tool, you can convert soapUI tests to UFT API tests.

8.  With UFT, new versions in different environment are supported that were not supported in QTP 11

9.  Start Page of Unified function testing provide links to new features, communities, useful links, and support. Using this we can connect to other users for forum support and information.

10. We can set preference to automatically export run results in HTML or PDF format after every run session through Tools > Options > General tab > Run Sessions

11. Bitmap checkpoint now enables to specify multiple areas to compare or ignore within the bitmap checking. It also supports checking whether a specific image appears anywhere within the runtime bitmap. 

Test Estimation : Understanding Test Efforts Calculation

Estimates plays very important role in successful projects as incorrect estimates can lead to time crunches , or improper resource utilization in case of excessive time in estimates.
In this article we will discuss various factors in estimation and how to create good estimates in a testing project.
Before providing estimates, we need to know the requirements of the project. First step before any testing task including test plans and estimates is to know what we are delivering to the client. Once we are clear on the requirements, we need to define the tasks that need to be done as exit criteria for the project. 


We have to answer following points before progressing with estimates:


1.   What is the time required to set-up the basic infrastructure. This includes acquiring resources, testing tools, setting up environment and training requirements of resources.

2.   What are the testing types we are performing in project? Does it include automation testing, API Testing, and other testing types?

3.   What is the Software Development Life cycle followed in the project, i.e. it is agile, waterfall or V-model, if iterative, what is the scope of each iteration.

4.   Is this project new phase of an existing project or a version of existing application to released in the current project.

5.  Techni Experience of resources working in Project. This helps to determine the time for preparing test artifacts.


So Once we know answers to above questions, we need to create a WBS document most preferably in Microsoft Project which helps in defining the tasks with time estimates, resources overloading  and defining milestones in project. Below points should be considered while creating the Work Breakdown Sheet.


1.  First of all create the high level milestone for the project. This can be various phases of the project or iterations of project in and agile methodology.


2.  Now create subtask for each milestones of the project. This will include tasks like test planning, test review, test execution, test data preparation for various forms of testing and regular team meetings.


3.  Task test planning, test review, test data preparation and test execution requires further breakdown of requirements into test scenarios and further into Test cases. Once the requirements are broken down into test scenarios/ test cases, we require estimates for each of the tasks.

Example: 


  • Suppose we have 250 test cases in an application for a particular milestone. We need to define time for test planning, test review, test execution, and test data preparation for each of the test artifact, can be test case for manual execution and test script in automation testing. Automation testing will also include task for framework development.

  • Now divide each of the test cases based on test complexity into high, medium and low complexity. Dividing and allocating time for each test case using test case complexity is very useful in case of large number of test cases where estimates for a particular test case in not feasible and time required for each test case is more or less uniform based on complexity. In this approach, time estimates are provided for test cases based on complexity. For e.g.  10 hours for test case preparation for high complexity, 6 hours for medium complexity, and 4 hours for low complexity.

  • In Point b), we provide test estimates based on complexity and was useful since time for test cases was uniform and there was large set of test cases. 

  • In case the project has 10 requirement of varying complexity, like 1 requirement will take 100 hours and other 2 hours, So Rather providing estimates based on complexity, we can define the estimate based on past experience of users, and provide below time:
    • Min Time to complete the task
    • Worst Scenario Time to complete the task.
    •  Average time to complete the task

  • We can calculate the average of above time to calculate time to complete the task. While providing the estimate as calculated in step c) we must take into consideration resources experience in the application and technology.

4.   We can provide time for each of the tasks in the work breakdown sheet. Summing time for all the activities will give us the test efforts required in the project.


5.   We further need to assign task to different types of resources based on the tasks and can provide resourcing estimates  for the project. we can define the resources utilization during different phases of project .


I will try to cover further in future articles on estimates things I might have missed here.