Blog to understand automation concepts in QTP, Selenium Webdriver and Manual Testing concepts

Automating Mouse and Keyboard Interaction using Selenium Webdriver

Using Interactions. Action class, we can automate various mouse and keyboard operations using Selenium Webdriver. We can also create a series of operation using Actions class, build the operations and perform the action in series.

Suppose we visit a shopping site, there can be main categories in the header of the Page, on hovering over a main category, sub categories can be displayed, and we can click on the sub categories.
There are three main steps which should be performed.
  •  Identify the series of actions to be performed. This can be an individual action e.g. hovering over a link to a series of event, e.g. pressing up Key in Keyboard, hovering over a link, click on a sub menu.
  • Once we have identified the series of event we need to build the action.
  • Once we have built the action, we need to perform the action.

This can be explained in code below:

//Import following class libraries
import org.openqa.selenium.interactions.Action;
import org.openqa.selenium.interactions.Actions;

Together with this, all the other class libraries for object identification needs to be imported, We assume we have set up for selenium in the machine and knows object Identification using Selenium as this is an advance concept in Selenium.If you want to learn more on basic concepts in Selenium, refer to previous posts in Selenium in this blog or visit the Selenium official website for required knowledge.

//define an object act of Actions class
Actions act = new Actions(driver);
// define the main link in the Page.
WebElement ElemElec = driver.findElement(By.linkText("Electronics"));
// define an object mousehover1 of action class. In action mousehover1, define the flow of event. Example in below case, we define series of events, hovering on the main menu, followed by submenu and then clicking the link.
Action mousehover1 = act.moveToElement(ElemElec).moveToElement(driver.findElement(By.linkText("Access"))).click().build();
mousehover1.perform();

This was an example of using action/ actions to identifying an element in the page using mouse operation and performing action on the same similarly we can automate keyboard actions using Interactions class.

Some of the useful methods of Acton/Actions class are:

  • click() or click(WebElement) – clicks on current mouse location or in the middle of the webElement.

  • doubleClick() or doubleClick(WebElement) – clicks on current mouse location or in the middle of the webElement.

  • dragAndDrop(WebElement src, WebElement tgt) - performs click-and-hold at the location of the source element, releases the mouse at  target location.

  • movetoElement(() or movetoElement(WebElement) – hovers at current location or Element identified by the webElement.

  • SendKeys, KeyUp, and KeyDown – Used to perform keyboard operation by sending keys

  • Build() – Once we have defined the sequence of action to be performed, we use build() to build the sequence of operations to be performed.

  • Perform() – Executing an action.


Details of all the methods of the action or actions class are explained in the Google code site for Selenium.
Please refer http://selenium.googlecode.com/git/docs/api/java/org/openqa/selenium/interactions/Actions.html for further details on the topic.


In the end, this is 100th Post of this blog. I would like to thanks all readers of the blog for supporting the effort.

Key Information in a Test Plan

Test Plan is a document providing structural approach describing how testing will be accomplished in the Project. This acts as a contract between testing team and stakeholders on how testing is planned for the project. 

For successful execution of testing in the project, it is very important to do thorough planning of the testing requirement and documenting the same in the form of test plan.

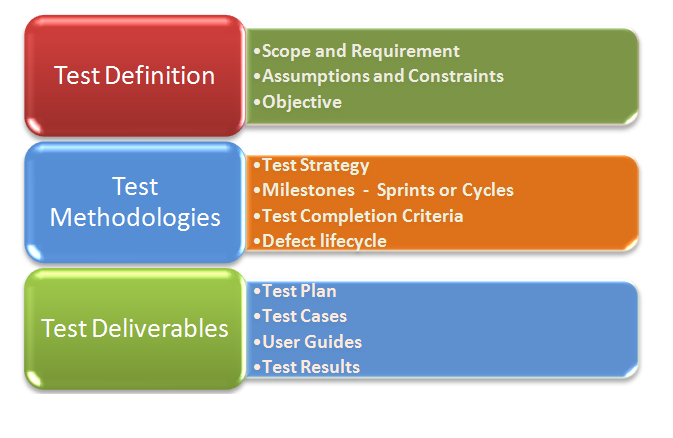
Most of the organisation have defined template for test plan and have slight difference in the structure of the test Plan from each other. What information needs to be captured in the test plan will be discussed in this article in the first section:

  • Defining the Scope of testing – The first and one of the important component in test planning is defining the scope of testing and at the same time providing the items which are Out of scope of testingScope of testing should be in line with the overall scope of Project. Defining scope early in testing helps in defining the acceptance criteria and agrees on the exit criteria for testing.

  • Objective of Testing in the Project should be defined - Objective of testing can be testing the functional requirement or creating an automation suite for regression scope. Also there can be multiple objective of testing with some critical and some secondary objective e.g. : Testing complete functional requirement of application can be primary objective of testing with communicating all known defects and issue with different stakeholder and closure on all of them before release to production can be the secondary objective of testing. All the objectives should be clearly defined in test plan. Each objective should have the priority defined and acceptance criteria should be associated with each test objective.
  • Staffing and training needs for the testing team should be mentioned in the test plan.
  • Environment and resource requirement required for testing, i.e. Software and hardware requirements should be clearly defined.
  • Assumptions acts as probable risks to Project. All the assumptions should be added in test plan and proper sign-off  should be taken from stakeholders to keep them informed and confirmation should be taken from them for the correctness of assumptions made during testing and will not lead to possible risks in future.
  • We should define constraints in the test plan. Constraints impact the efficiency and effectiveness of testing. Constraint can include for e.g. staffing, time or cost constraints

To summarize, so far we have discussed the ‘What’ part of testing, i.e. What we will test, what will be our scope, what our assumption, constraints are, what will be the scope of testing. Once we are clear on What, Next question is how to do what.


How Testing will be executed is explained in Testing Methodology. The Key points explained in Testing Methodology include:

  • Define testing strategies for different phases and functional and non-functional requirements. This includes:

    • Different types of testing required for requirement.

    • Approach for each testing type, e.g. Regression, functional, automation or locale testing.

    • Risk/issues identification and test data generation for testing types.

    • Testing cycle for each testing and testing milestones are set.

    • Entry and exit criteria for each testing milestones are described

  • Providing defect lifecycle to be followed.
  • Defining testing schedule in sync with the milestone defined.

Another Topic to be covered in test plan includes test deliverables and defining the exit criteria for testing completion. Test deliverables should be defined; it can include user guide, test scripts, test data, Test execution results, and Test plan.


Together, we can add matrix for different areas in test plan for easier understanding and better explanation. We will discuss on methodology and test deliverables in details in the next articles on topic Software Testing.

Risk Analysis - Next Steps for Identified Risks


Once by using different Risk Identification techniques as described in previous article, we have identified all the possible risk in the project life cycle, Please see  First Step in Risk Analysis – Techniques for Identifying Risks,  The next phases in Risk Analysis post risk Identification phase in order of their occurrence  are as follows:
  •  Use Organisation level risk Management Template or use Risk breakdown sheet. – Most of the organisation has templates defined for Risk Analysis. It makes no sense to reinvent the wheel. Some of key data that we need to store for each risk are defined as below:

a.    Risk Definition – This explains what the risk is.

b.   Root Cause – We need to analyze what is the root cause of the risk. Analyzing risk root cause help to identify where problem and it is highly possible that more than one risk have the same root cause. So countering the root cause using control can help solve multiple goals in one go.

c.   Risk Categorization – Categorization risk is important to group risk. Risk can be classified broadly into three categories, Technical, Internal or External risk. Classifying Risk into categories helps to get proper input from the experts or specific team. For this risks can also be sub-categorized. E.g.: Risk can be related to Infrastructure team or Legal team, So we get input and control actions from the expert group in one go, and helps to get proper inputs from the required team or individual.

d.   Once we have root cause, categorization, and risk definition. We need to provide the control action on how to avoid or reduce the impact of risk.

e.   When we define risk, the probability of happening of a risk can vary from project to project. Probability of risk occurrence needs to be understood and provide in the template

f.    Similar to Probability, Impact of risk is very important. Even a low probability risk can be highly critical in case its business impact is very high. Control action is must, and should be well thought of as it can affect business
.
g.  We also need to identify in which phase  risk can turn into a loss. E.g. : Assumption which are also risk should be resolved in requirement Phase and so on. Response of risk events occurring early in the project should be handled first and detailed risk mitigation plan developed for the same.

h.   Risk should be quantitatively analyzed especially with high impact, high probability, or both to generate statically cleaner data for risk occurrence and its impact. Decision tree, distribution models, and tornado diagrams are some example of the same.

i.   Define the expected monetary value of the risk converting to loss taking into consideration both impact and probability

j.    Next Step is to assign risk to required stakeholders. We can break the document into high to medium priority risk and low and trivial priority risks in another document. So that major focus is not diverted on low and trivial priority risks.


k.   Once we get the response, we need to maintain the template document used with the responses and response provider to clarify with the Risk Owner.


  • Once we have created the template, we still require regular risk meeting and risk monitoring in process, so as to add any new risk identified during the project life cycle and also to track how we are faring with the risk identified